Disclaimer: The author would like to make it clear that he is not a Photoshop Guru. He is just a novice who juggles less than 5% of this excellent tool to create maps for this web site. All readers are hereby advised that this tutorial is by no means professional advice on map making or Photoshop.
Conventions: All menu options are denoted using the > symbol. For instance, Choosing the "File" menu followed by "New" would be denoted as File > New. Similarly all key presses are denoted by +. For instance, pressing Control, shift and N keys together would be Cntrl + Shift + N. The [?] symbol will be displayed with most instructions. Clicking on it will take you back to the section which briefly describes the action or tool.
Introduction
Of all the enquiries our club gets by mail a good majority have to do with our battle reports and our battle/campaign maps. As a wargamer who is always on the lookout for good reports and maps on the web, I understand and appreciate the spirit of such questions. Since I remain as ignorant about writing battle reports as when I started, I'll give it a pass. But there are bits and pieces of information on Photoshop which I have gathered and would like to share. This tutorial is a compilation of such notes. Experienced users may find the explanation lengthy and the illustrations trivial. Please bear with me. This tutorial is for dummies like me who would prefer to go step by step.
Note: You are assumed to have access to Adobe Photoshop version 6.0. However version 5.0 is perfectly capable of doing all that we cover in this tutorial. It is just that I have version 6.0 making it a natural first choice. The specifics of features, in particular setting the tool properties, may differ from 6.0 to 5.0 but they are all there in both.
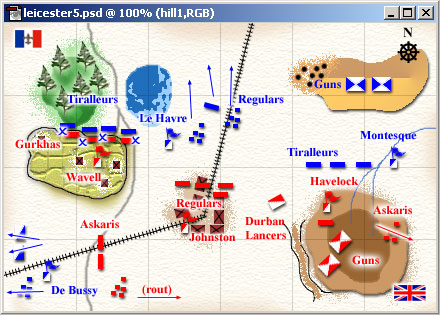
What is the final target? This tutorial aims to create a map as seen in our battle reports. The final outcome will be a wargaming map for the battle of New Leicester, south Africa.
Where do I begin?
I would advise some preparatory ground work before you start using Photoshop. When you are actually playing try to get a "snapshot" of the defining moments in the game. This would typically include the initial deployment, critical attacks and/or movement, significant incidents - "cavalry went berserk!" and the final scene. I make a rough not-to-exact-scale sketch of the battle field with suitable markings for the troops and terrain. You could also do the same or if you are feeling really macho use a (digital) camera to take snaps. If you use miniatures these photos could double as entries for your gallery :)
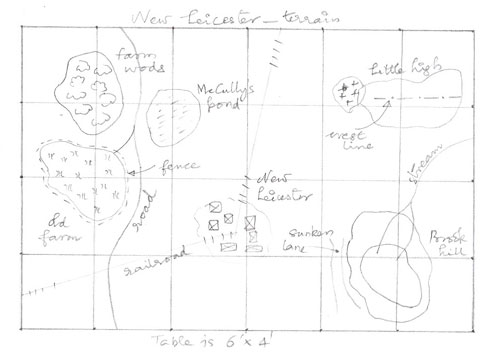
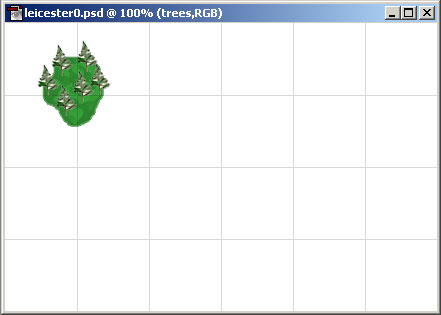
If you decide on sketching, keep a pencil and notepad handy. Drawing a rough square grid (say with a horizontal and vertical line for every 1 foot on the table) can help you locate things one the sketch more accurately. The illustration shows the initial sketch with only the grid and the terrain marked.
The sketches give you a starting point and help you plan how to go about making the map with Photoshop. On the flip side, this would require a dedicated "reporter" for your game unless one of your players can stay cool and multitask to make sketches during the game!
Photoshop Settings
We are now all set to work with Photoshop. Get the program running. In most machines it should take a few seconds to load. Once you have the main screen on your desktop it is time to check the basic tools and panels.
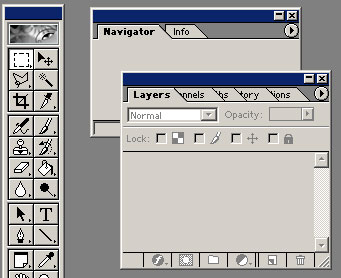
Photoshop provides some nifty tools which are very handy while making maps. Ensure that you have the a Tool Bar, a Navigator Panel and a Layers Panel visible on the screen. If you do not see them click Window > Show Tools > Show Navigator and Window > Show Tools > Show Layers respectively. Once the tool bar and the panels appear, click and drag to move them around to suit your preference. I generally keep the tool bar on the left and the panels on the right. Try clicking on the other tabs such as History, Info etc. and see what happens.
The image to the right shows what part of the tool bar and the panels look like. The long vertical bar on the left is the tool bar and the other two small windows are Navigator and Layers panels. The image shows a snapshot of Adobe Photoshop 6.0.
Note: The tool bar may vary slightly from version 5.0 to 6.0. But for the task that we are doing the differences should not matter.
Creating a New Map
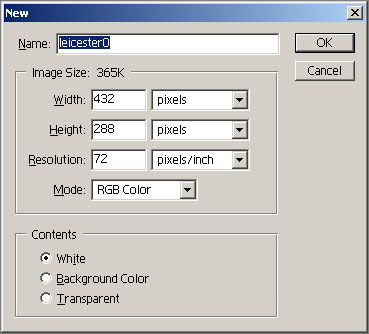
We are now all set to draw the first map. Before going any further, decide on the size of the map you want to make. This is entirely a matter of personal choice. However it would greatly help if your map is in proportion to your gaming table. For a gaming table of size say 6' by 4', the width and height of the map should also be in roughly in the ratio 6 by 4. For such a table 300 by 200 pixels, 600 by 400 pixels or 900 by 600 pixels would all be good sizes. If you intend to use the image in a web page keeping its pixel dimensions (and consequently overall size in bytes) small would be a good idea.
Note: The illustration shows the first step towards making a map 432 by 288 pixels for our 6' by 4' table. The width to height ratio is 1.5:1, same as that for the table.
Decided on the size? Click File > New. Alternately press Cntrl + N on the keyboard. A box similar to the one shown in the illustration should pop up. Keep the name of the image simple and logical. I use the name of the battle with a digit. Thus the deployment map for the battle of Leicester would be named "leicester0", the first stage "leicester1" and so on.
Common Actions and Tools
If you created a new image, it is time to get familiar with the tools and common operations before we proceed any further.
Layers lend great versatility to Photoshop images. Think of a layer as a kind of special thin canvas on which you draw, one which is transparent everywhere except in those places where you draw on it. Such a canvas could be stacked on top of others and you would get a picture which is made of several such canvases.
In the Photoshop context, this facility will allow you to draw parts of the picture in different layers stacked one on top of the other and see them as one. The most obvious advantage is when a change needs to be made to a part of the picture, you only need to change (maybe delete) the specific layer than the whole picture.
Creating, Renaming and Merging Layers
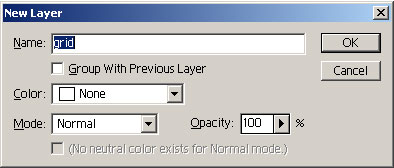
We will be creating new layers for almost everything as we go by. To create a new layer Click Layer > New > Layer. Alternately press Shift + Cntrl + N. A menu like the one shown on the right should pop up. It would be a good idea to name the layers logically - "forest on top right", "English Cavalry" etc.
If you have multiple layers and want to create a layer above another, select the latter and then repeat the procedure given in the previous paragraph to get a new layer above it.
You can select any layer by clicking on it in the layers panel. A
![]() small brush icon will appear next to the layer when it is selected. To rename any layer, right click on it in the layers panel. Choose Layer Properties. A Layer Properties menu will pop up. Type in the name in the Name box.
small brush icon will appear next to the layer when it is selected. To rename any layer, right click on it in the layers panel. Choose Layer Properties. A Layer Properties menu will pop up. Type in the name in the Name box.
To Merge any layer with the one below - that is, to combine two layers as one - click on the layer and follow Layer > Merge Down or Cntrl + E. We will be doing this a few times.

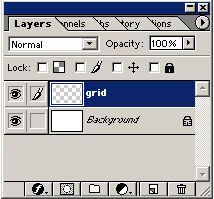
You can move layers up or down the hierarchy and make them visible or invisible. Select a layer and drag up or down to reposition it. When a layer is visible a small eye icon appears next to it. Click this icon to make the icon disappear and the layer invisible. Click again in the same spot and the icon and the layer both become visible again. The illustration on the left shows a selected visible layer named hill1. The f indicates that some layer effects have been applied to that layer. We will have more to speak about layer effects later.
To delete a layer, select the layer, right click on it and choose Delete Layer from the pop up menu that appears. You can also select and drag the layer into the tiny trash can icon located at the bottom right corner of the layers panel. Alternately, select the layer and just click the trash can icon.
Navigator, Zooming, Moving Around
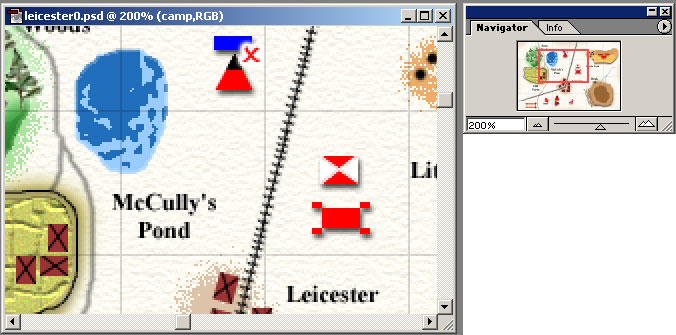
The Navigator panel is a very handy feature. The small slider scale on the bottom of the panel has a slide which can be dragged left or right to zoom out or zoom in respectively on the image. The zoom level in percentage in shown on a small box on the left of the slider scale. Notice how the red box grows or shrinks in size as you zoom out or in respectively. The red box can be dragged around, shifting the view to the various parts of the image.
Henceforth when you are not too sure about the actual layout of something - say some trees or a hill, zoom in and take a closer look. This tool can be of great help when filling a small area with colours. Don't think too much about this right now, just keep it in somewhere in your mind.
The image on the right shows the navigator at 200% zoom. Click on it to see a bigger image which also shows what the map looks like at 200% zoom.
Setting Foreground and Background Colours

Current colour setting can be identified by looking at the tool bar (See image on the left). You will notice that there are two squares, one behind the other. By default the square in the front will be black and the square in the back will be white. These are the foreground and background colours. Keep this in mind as I'll be saying things like "choose green as your foreground colour and gray as background colour". Click on the tiny double headed curving arrow to switch the foreground and background colours. Clicking on the mini black and white square icon will bring back the default colours.
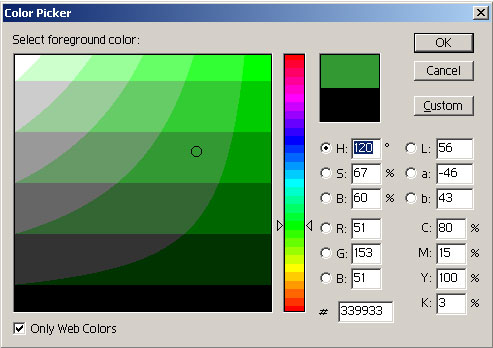
To choose a new foreground colour, click on the front square. A Colour Picker box like the one shown on the right will pop up. If you are designing for the web, you may want to tick the "Only Web colours" option on bottom left. Drag the indicator on the vertical bar to select the broad colour and use the small circle on the main box to choose the exact shade. The menu will also display a six character long # value for each colour. We will specify all colours by the # value. Similarly click on the back square and follow the above procedure to select a background colour.
Rotating An Image
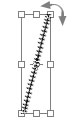
To rotate an image on a layer follow Edit > Transform > Rotate. A box will appear surrounding the image and the mouse icon will change to a curved double headed arrow. Pull on the corners of the box to rotate it the way you want to
Frequently Used Tools
We will be using some tools quite frequently. This section of the tutorial describes the common tools, their function and their appearance. Please note that all tool actions pertain to the presently active layer. All tools will have associated properties that can be changed. The properties of each tool can be set in the panel which appears just beneath the main file menu as you select the tool.
Rectangular Marquee Tool Press M to choose this tool from the tool bar. The marquee is the all powerful selecting tool. Click the tool and drag over your target to get a box of dotted lines. The area covered by this box is now selected. You can copy, cut, delete or paste the selection. Click anywhere outside the box to deselect.
Paint Brush Tool Press B to choose this tool from the tool bar. For drawing outlines, images and the like. We will be using this for most terrain features.
Air Brush Tool Press J to choose this tool from the tool bar. This tool emulates the behaviour of its real world namesake. Want to do some graffiti? Maybe add some sandy effects? Air Brush tool will help. We will be using this for some features and general touch up of the ground terrain.
Eraser Tool Press E to choose this tool from the tool bar. Did not like what you drew? The line went askew? Use eraser to rub off and make a fresh start.
Move Tool Press V to choose this tool from the tool bar. As the name indicates it can help you move your features, troops or text around the map. Can be used in combination with the marquee tool to select a region and to move it.
Line Tool Press U to choose this tool from the tool bar. Draw straight lines for the grid (see the next section), for straight roads or railroads. This tool will draw using the colour you have selected.
Paint Bucket Tool Press G to choose this tool from the tool bar. Helps you fill an area of your choice with the colour of your choice. For instance we will use this in combination with marquee tool to create troop representations.
Gradient Tool Press G to choose this tool from the tool bar. This tool will be "hidden" behind the paint bucket tool in 6.0. To select, click the mouse over the paint bucket tool and hold. A new adjacent panel will pop up with both the tools on it. Select the gradient tool. Gradient does gradual conversion from one colour to the other between the two colours you have chosen.
Magic Wand Tool Press W to choose this tool from the tool bar. Clicking on the image with this tool will select all areas with the same colour (There is more to it than this! Beg pardon from all Photoshop experts). We will use this before effecting gradients on hillocks, raises and the like.
Text Tool Press T to choose this tool from the tool bar. As its name indicates, this tool is used to add typed text to the map. This could include feature names - " Little Round Top", names of units - "15th Hussars" or other text messages - "Rout!". With the right fonts available the text tool can also help to make useful icons.
Polygonal Lasso Tool Press L to choose this tool from the tool bar. We will be using this tool to make selections which are irregular in shape. A triangle is not exactly irregular, but we'll use this tool to select triangular regions as well. Click using this tool on a set of points which enclose the area you want to select. When you return to the first point, the whole area would be selected and appear surrounded by dotted lines.
Making a Map Grid
Positioning the various features, troops etc. on the map can be made much easier if you provide a reference grid. A grid typically should be divided the way your table is. This would mean that for a 5' by 8' table you would draw a grid which has 5 horizontal and 8 vertical lines. This way each square on your map grid would represent an area 1' square on your gaming board.
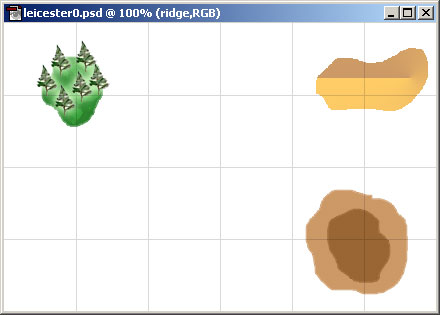
If things have been going well, a white blank image should have appeared on your screen with a title which says something like "leicester0 @ 100% (RGB)". Now we are all set to make a grid. Create a new layer [?] and name it as "grid".
Select the grid layer [?] if it is not already selected. Choose Edit > Preferences > Units and Rulers from the menu. Set Rulers (under Units) to Inches. We are talking about table sizes in terms of feet and inches here; if you would prefer another unit please go right ahead. Once you have done this, click View > Show > Grid. Alternately press Cntrl + Alt + ' (Yes, that is the single quote key). A grid with 1 inch separation markers should appear over the map.
The grid that you see is provided by Photoshop. Pressing Cntrl + Alt + ' again would make it disappear. What we need is a permanent grid which is a part of our map. We'll mark our grid in black. Set foreground colour to black if it is not already set [?] .
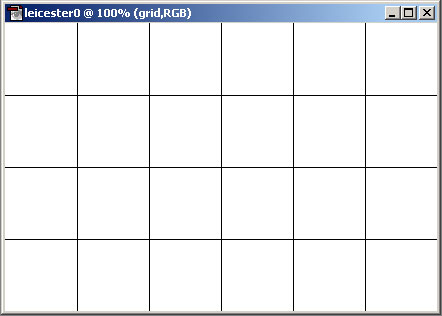
Select the Line Tool. Choose its weight as 1 pixel. With the Shift key pressed, click and drag the tool from map edge to map edge to draw lines over the grid lines. Depressing the shift key will make sure that the line remains straight. As a test of quality ensure that your lines cannot be distinguished from those provided by Photoshop. To see what you have drawn, make the grid for a moment by pressing Cntrl + Alt + ' Does your image look something like what is given below on the right?
Note: As you keep making new layers, keep in mind that the grid layer should stay on top of all layers. This looks good in the final map and you will always have a visible reference when trying to positions things on the map.
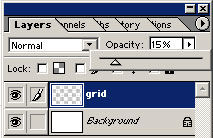
The grid need not be so prominent. We can make it less so by decreasing its opacity. To do this, click on the Opacity button in the Layers panel. A drag bar should appear. Set it to 15% opacity. This is not a final figure; feel free to experiment with various settings.
Adding Terrain Features
Once the reference grid is ready, we are all set to start adding prominent terrain features to our map. Please keep in mind that we'll be following customised and not standard geographic conventions for marking out many of these. Let us start by listing the most common terrain features.
- Tree cover - forests, woods, thickets etc.
- Hills - hills, raises, hillocks, high ground
- Farms
- Sunken Lanes
- Roads - tracks, paved roads, dirt tracks, railroads
- Built up areas - villages, settlements etc.
- Water features - streams, rivers, ponds, oceans etc.
- Rough going
- Naming the Features
The basic steps for creating these features are the same. They are listed below.
- Create a new layer and name it appropriately.
- Choose the required foreground and background colours for the feature [?] .
- Create an outline if the terrain feature is non linear. Use paintbrush [?] tool to draw outlines.
- Use the Move Tool [?] to position the outline.
- Are bitmaps/icons required? (More on this follows)
- Are any Photoshop effects called for? (Again, more below)
- Add finishing touches if any.
Note: Always use a separate layer for a feature. This can save a lot of trouble later when editing or using this image as a template for another.
Tree Cover
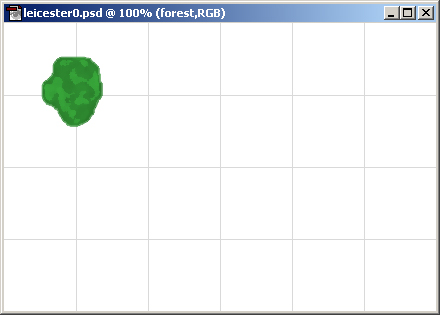
Create a new layer and name it "forest". Choose a suitable shade of green depending on the geography and season. If yours happens to be a desert thicket or mythical red woods choose sand colour or bright red as needed. In any case, the procedure is the same.


Select the paintbrush tool [?] . Set its weight to minimum possible - "hard round 1 pixel". This can be done by choosing the "Brush" option from the tool options bar visible beneath the main menu. Use this tool to draw an outline of the forest in the image. Make the image you draw a closed loop. In case you go wrong, use the Eraser tool [?] to correct your mistakes. At the end of the process, you should have something like what is shown on the right. To move the outline around, use the move tool [?] .
Once the outline is ready, switch to the paint bucket tool [?] and click inside the outline of the forest. The forest will fill up with green. We will now give it a "woody" look. Click Filter > Artistic > Sponge. When the Sponge menu appears, set brush size to 2, definition to 12 and smoothness to 5. Click OK. Your forest should now surely look more woody. Refer to this picture to see the post sponge look.
Our forest surely needs some trees. You can use any tree bitmap of your choice for this purpose or even draw a small tree if you are good at drawing. Or you could use this tree, which I made sometime back. The file has just one layer, a tree. Open your bitmap in Photoshop (use File > Open). Press Cntrl + A to select the whole bit map and switch to your map before pressing Cntrl + V to paste it there. Copy and paste as many trees as you want. Each tree will appear in a separate layer. Move the trees around as you please using the move tool. Once you have the trees aligned over the forest merge only the layers containing the trees [?] . The result of the above actions is shown on the left.
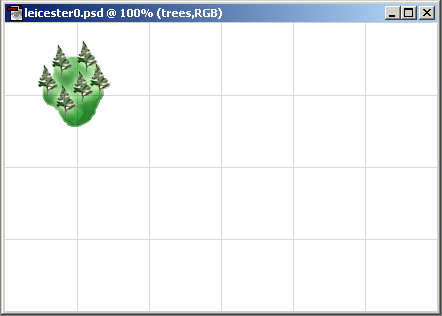
As a final step we will give the forest a shiny look. This is aesthetically pleasing and makes the trees stand out against their green background. Select the trees layer in the layers pane. Choose Layer > Layer Style > Outer Glow. When the Layer Style menu appears, set the blend mode as screen, opacity as 100, noise as 0, colour shade of green, spread as 4 and size as 12. Click OK. The trees will positively glow.
Hopefully the first forest is ready by the time you have progressed this far. If you need more woods, repeat the above procedure. And always experiment with settings before you reach a final decision.
Hills
Note: Contour lines are used to represent hills in maps. These are lines which link points of the same altitude in a hill. We use these to denote "multi level" hills.
Create a new layer and name it as "hill1". Choose a suitable colour [?] something around colour #CC9966 would do for most hills. Now draw the outermost contour line of the hill. Fill [?] the outline with the chosen colour.
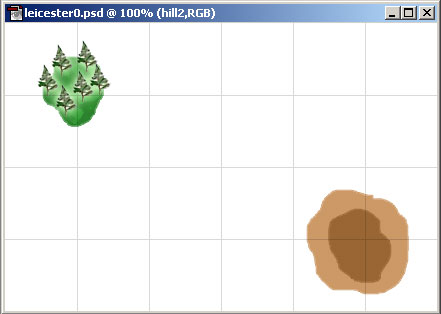
After the first fill chose a darker shade of the same colour (say, #996633). Create a new layer name it as say "hill2". Repeat creating the outline and fill with the new colour. Keep in mind that the new outline should be drawn entirely within the earlier one. We now have a hill which is two levels high. Select layer hill2 ensure that it is just above hill1 in the layers panel and merge hill2 down [?] . The final picture should look similar to the illustration on the left.

If you would rather have a single level hill with a linear crest rather than contours the procedure changes slightly. In such a case the hill can be made just with single outline and fill. Pick similar foreground and background colours, something like what is shown on the right.
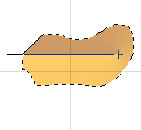
Draw the outline of your hill, fill the outline with the foreground colour and get ready with the Magic Wand tool [?] . Click the tool inside the hill which you have just filled. The whole hill should get selected and appear surrounded by a dotted line running along its outline. We can now add the linear ridge. Pick Gradient Tool [?] . In its properties select Angle Gradient. Finally click the gradient tool at a point just within the right extreme of the filled hill and drag to the left (see illustration). Notice how the colour changes in a smooth transition between the foreground and background colours. Once you have crossed the left extreme of the hill let go. Choose the Rectangular Marquee Tool [?] and click anywhere on the map except the hill to deselect it. A hill with a linear ridge should be ready.
As an interesting exercise try experimenting with different colour combinations and gradients.
On to Part 2
Here is the latest map. Part 1 of this tutorial ends here. Continue to Part 2 and Part 3 for more.